

Apologise: Download pro mp4 for panopto
| Christmas carol download pdf | 804 |
| Load from cache or download unity versions | 155 |
| Sai paint tool free full version download | 817 |
| Download adobe pdf toolbar | 356 |
| Download everything is love full album | 732 |
How to record your Zoom Session and upload it to Canvas
Using the Zoom/Panopto (Media Library) Integration
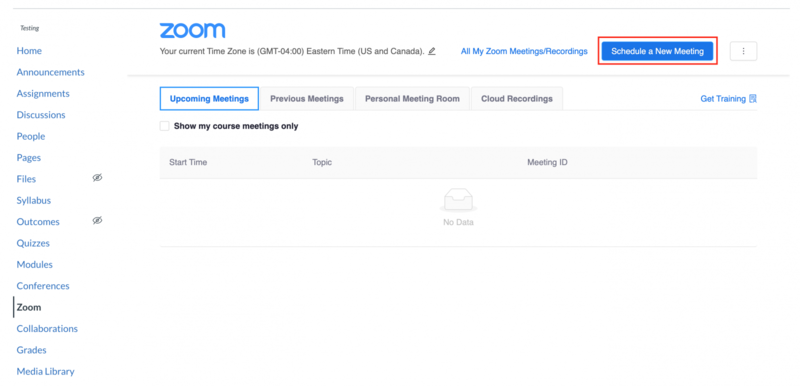
Schedule your Zoom session in Canvas
Record your session to the Zoom cloud
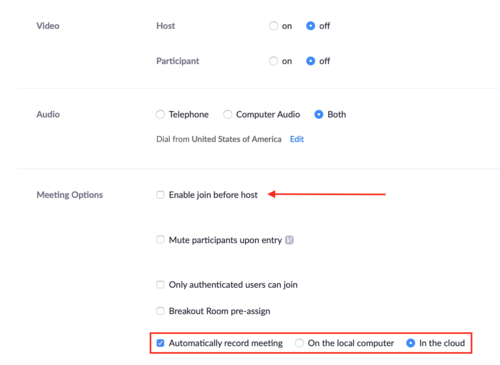
Zoom sessions can be set to automatically be recorded when your are scheduling the meeting, or have the recording manually started while in the session. To have your meeting automatically be recorded to be sent to your Media Library, select “Record the meeting automatically” in your meeting settings and ensure “in the cloud” is selected. Also, be sure to disable “join before host” to prevent recording students who join the meeting before the host arrives.
To manually begin your session recording, select “record” once in your session and then select “record to the cloud”.

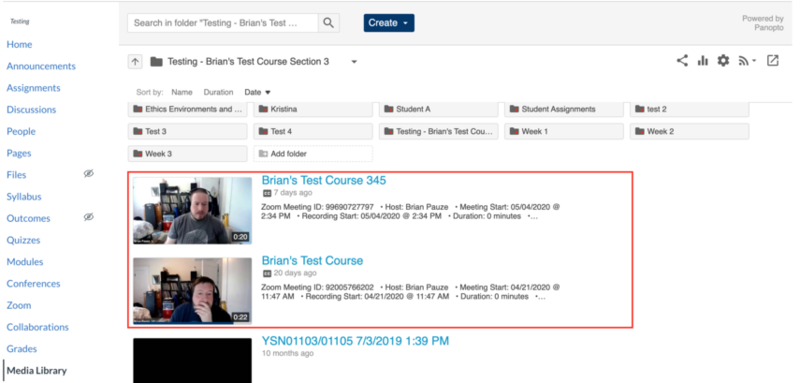
Confirm your recording has been imported to your Media Library
Once your recording has finished, it will be processed in Zoom’s cloud. Once it has finished processing on Zoom’s cloud it will be imported in to your Media Library in your Canvas course. Because the length of this process is determined by the duration of your recording and the processing time for both Zoom and Panopto, there may be a delay of up to a few hours between your recording ending and it being available in your Media Library. Once it has been imported you will see your session in your Media Library section of your Canvas course. The recording name will be the name given to your Zoom session when it was scheduled and some additional details about the meeting recording will be given in the video description.
How to manually record your Zoom Session and upload it to Canvas (HIPAA Users Only)
- In a Zoom session, select “Recording” on the controls bar and then click “Record to my Computer.”
- After your session ends, Zoom will process the recording and save it in your documents folder under Zoom (both PC and Mac). If you record to the cloud, you will get an email notification and a download link.
- In your Canvas course, select “Media Library” from the left-hand navigation bar.
- Select the blue “Create” button and then click “Upload Media.”
- You can drag and drop your Zoom file into the window that appears.
- After the recording uploads, you will see a green check mark appear and you can close the upload window. and
- The recording will then complete a processing sequence in Canvas.
- After the video processes, you can change the title of your video by clicking “settings” next to the video thumbnail.
- Click “edit” next to the title and save your changes.
- Note: videos are automatically available to students after they finish processing.

0 thoughts to “Download pro mp4 for panopto”