

Red Hat Enterprise Linux
1. Download Red Hat Enterprise Linux (RHEL)
In this step, you will download Red Hat Enterprise Linux Server. For the download, you will need to register with developers.redhat.com. After you register as a developer, you will be given a subscription for Red Hat Enterprise Linux Developer Suite. Red Hat Enterprise Linux Server and additional development tools are included in Red Hat Enterprise Linux Developer Suite.
Download the Red Hat Enterprise Linux Server DVD file.
Note: Later in this guide, you will need the Red Hat username and password you create during registration for accessing Red Hat sites.
2. Install RHEL on Bare Metal
This section provides an overview of the key steps for installing Red Hat Enterprise Linux so you can get started with software development. Note: This tutorial does not replace the Red Hat Enterprise Linux Installation Guide. Instead, this tutorial provides an overview of the key steps for software developers. For detailed instructions, see the respective manual.
A few things to keep in mind:
The Red Hat Enterprise Linux Server you downloaded in step 1 will be used to install a system with a full graphical desktop. You will select Server with a GUI under Software Selection during installation. By default, Red Hat Enterprise Linux Server will not install a graphical desktop.
You will need to select an Installation destination, which is the disk or partition(s) where the software will be installed. The disk or partition(s) you select will be overwritten. Make sure you understand your selection before starting the installation to avoid accidental data loss.
You should configure networking under Network and host name before starting the installation. You will need access to the Internet to complete registration and download additional software. The network can be configured after the system is installed. However, the steps are more straightforward during installation.
Create your primary user account during installation: After the installation begins, you will be instructed to set a password for the root account and be given the opportunity to create a regular user account. You should create a user before the installation process completes. The regular user will be your primary login for development. The root account should only be used for system administration tasks. If you don’t create a user before the installation completes, you will need to reboot and then log in as root to create user accounts.
System Requirements
The requirements for your physical system are:
For 64-bit ARM servers, we recommend network installation (RHEL 7.5 is required).
Instructions for making a bootable DVD or USB drive for 64-bit x86 systems can be found in the Red Hat Enterprise Linux Installation Guide.
If you encounter difficulties at any point, see Troubleshooting and FAQ.
Installation instructions
Start the system from the bootable disk and select Install Red Hat Enterprise Linux.
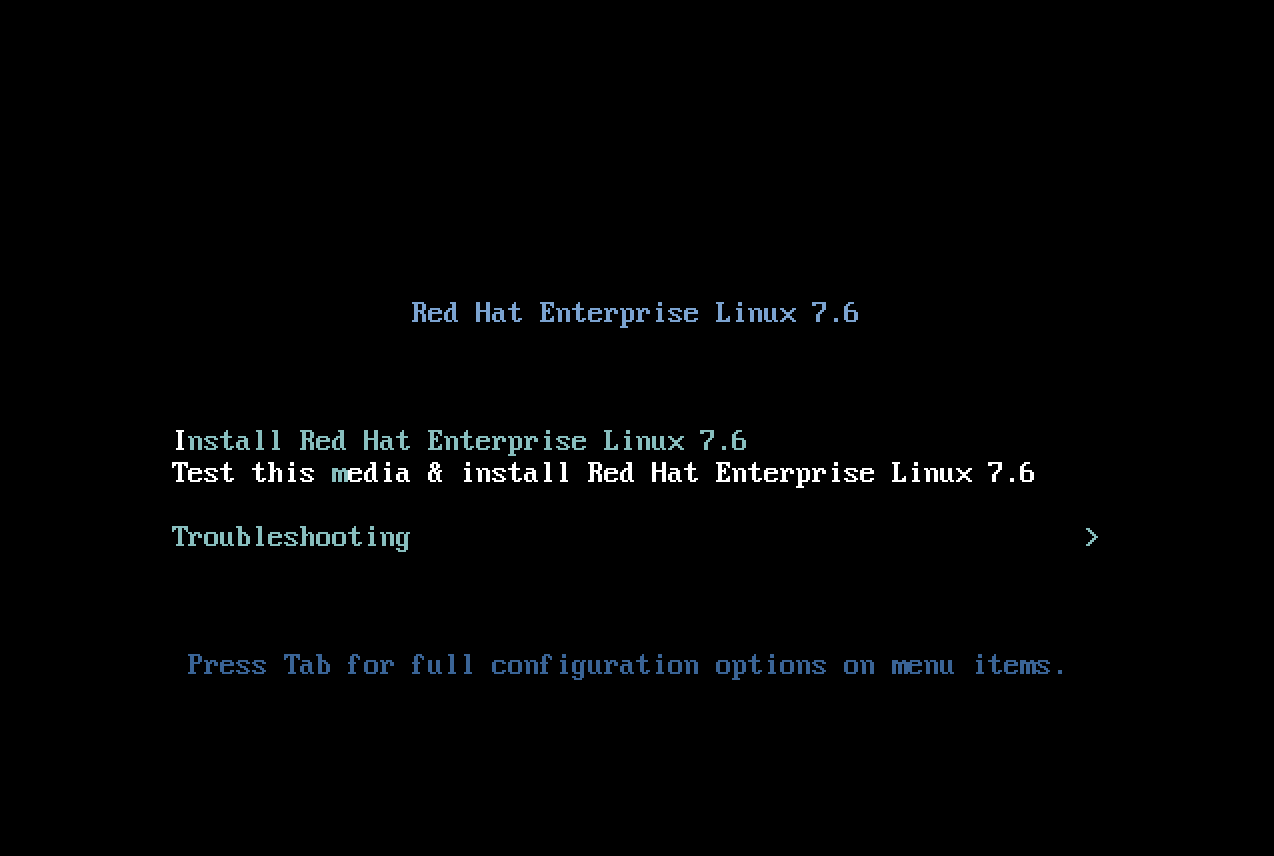
Note: you can skip the media checking step by hitting the Esc key.
Select your preferred language and keyboard layout to use during installation.
Under Localization review the settings and make any necessary changes for date and time, language, and keyboard layout. Note: The Done button to return to the Installation summary screen is located in the upper left corner of the screen.
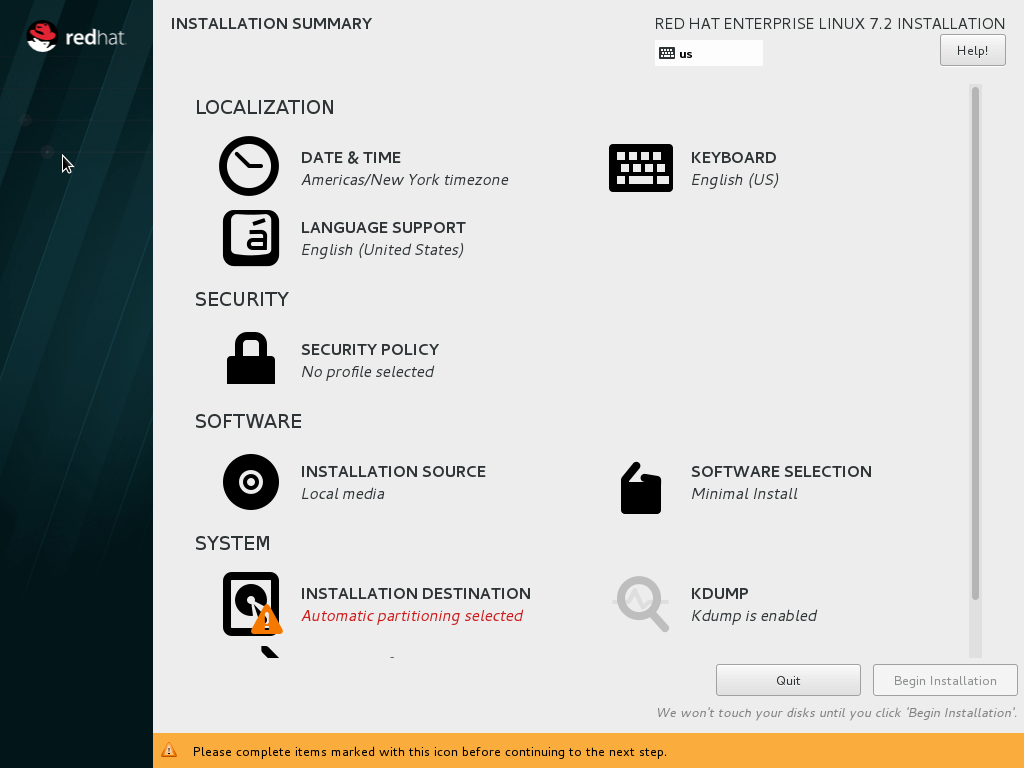
Perform the follow steps to make your software selection:
Click Software selection.
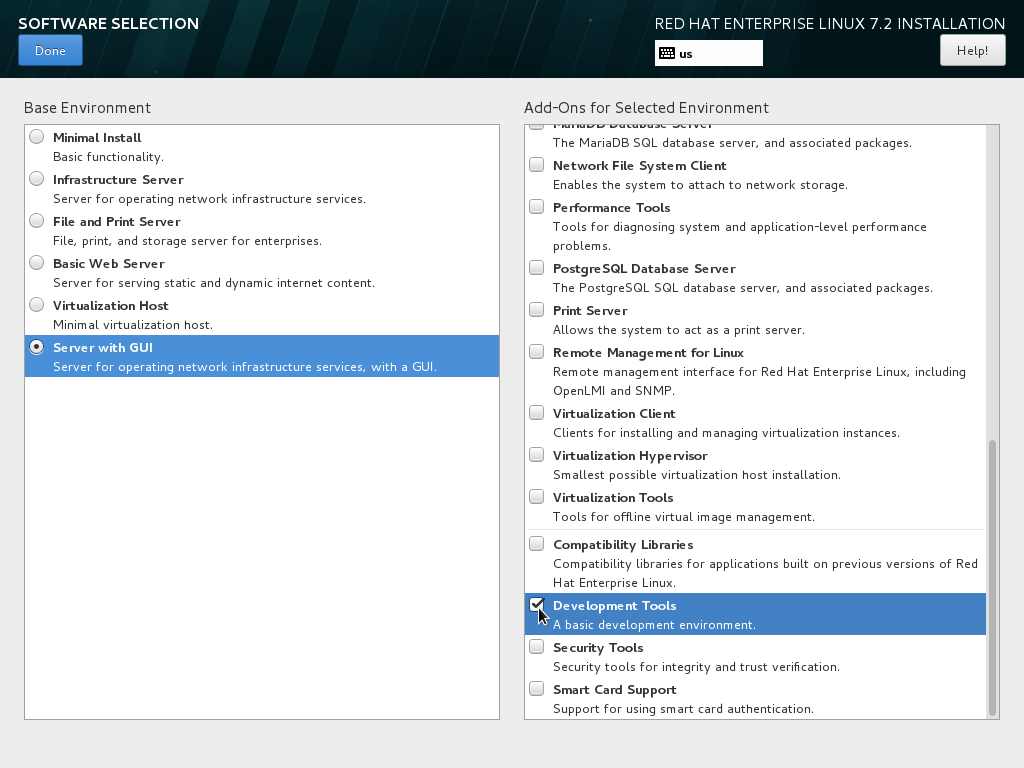
On the next screen, under Software selection, in the Base environment list on the left, select Server with GUI.
In the list Add-ons for selected environment on the right, select Development tools.
Click the Done button. Note: After returning to the Installation summary screen it will take several seconds to validate your choices.
Click Installation destination to specify which disk or partition(s) to use for Red Hat Enterprise Linux. Note: It is important that you understand the choices that you are making in this section to avoid accidental data loss. It is strongly recommended that you read the Installation Destination section of the the Red Hat Enterprise Linux Installation Guide. The installation destination should be at least 20 GB or larger to accommodate the OS, graphical desktop, and development tools.
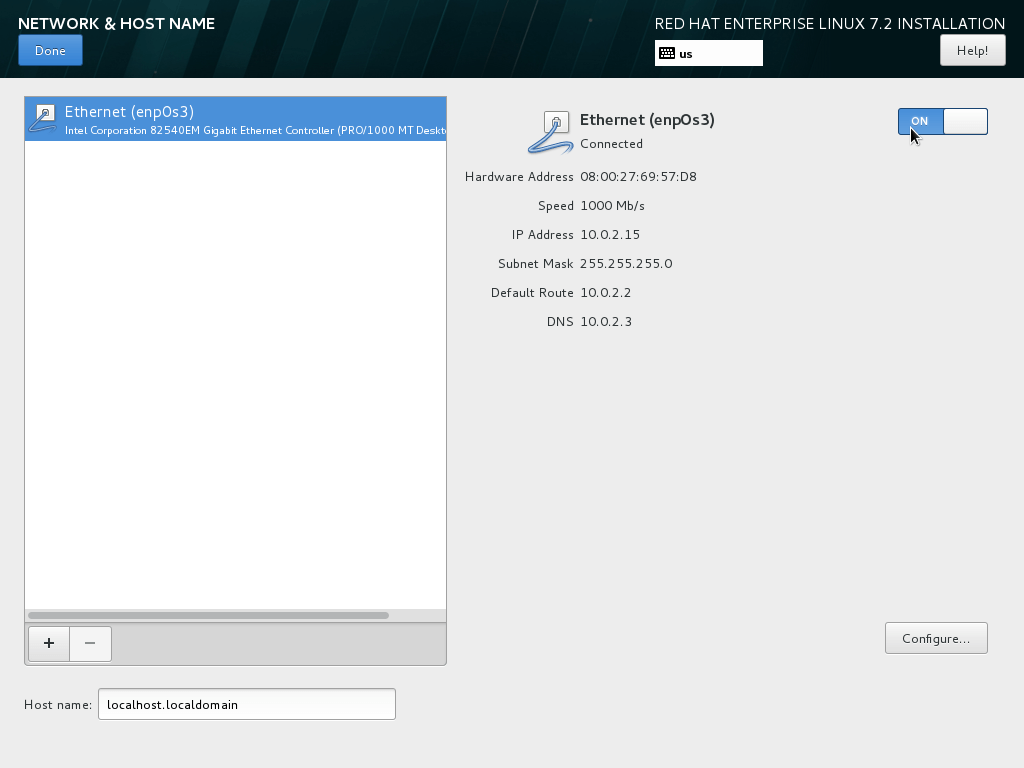
Click Network & host name to configure the network. If the system has more than one network adapter, select it from the list on the left. Then click the On/Off button on the right to enable the network adapter.
Click Configure to review and/or change the default settings for the network adapter. The default settings should be fine for most networks that use DHCP.
Optionally, set a Host name for the system.
Click Save to dismiss the network adapter configuration dialog.
Before leaving the Network & Host name screen, make sure there is at least one network adapter enabled with the switch in the On position. A network connection will be required to register the system and download system updates.
Click Done.
Click KDump to disable KDump and free up memory. Click the box next to Enable kdump so that it is no longer checked. Then click Done.
Click the Begin installation button when you are ready to start the actual installation.
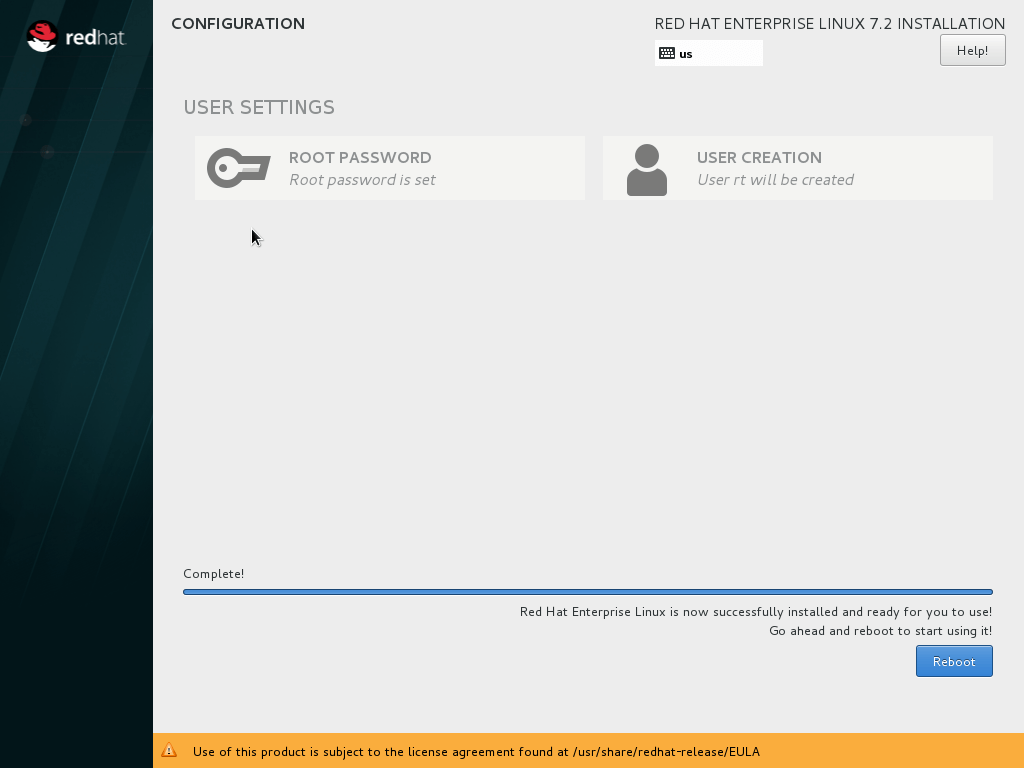
On the next screen, while the installation is running, click User creation to create the user ID you will use to log in for normal work.

Click Root password to set the password for the root user. Note: If you choose a password that the system considers to be weak, you will need to click Done twice.
After the installation process completes, click the Reboot button.
If you need help, see Troubleshooting and FAQ.
3. Get ready for software development
This section has a number of post-installation steps that complete the installation of Red Hat Enterprise Linux and prepare it for software development. The steps are:
Accept the license agreements and register the system with the Red Hat Subscription Management.
Install the latest software updates.
Add additional software repositories containing development software.
Complete installation and register the system
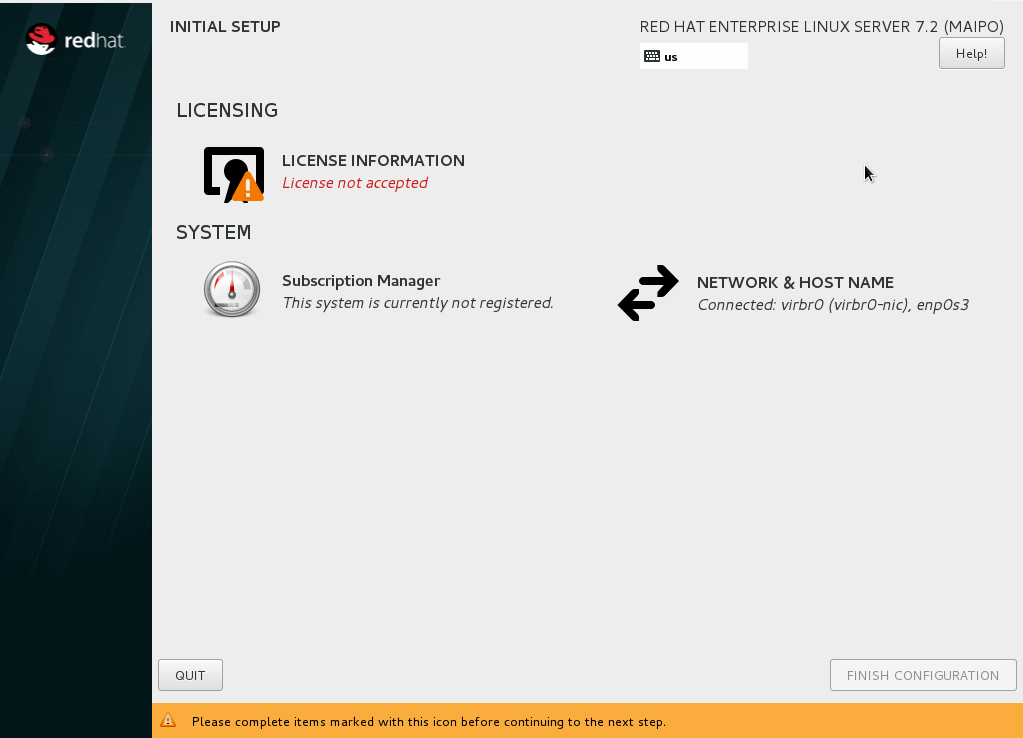
After installation, during the first boot of the system, you will be asked to accept the license agreement and register the system with Red Hat Subscription Management. Completing these steps are required for your system to download software from Red Hat.
Note: In some cases, when booting the system for the first time, you may not see the graphical post-installation screen shown above. If you see a text-based license acceptance prompt follow the instructions in Complete installation and register the system (alternate) instead.
Click License information to go the license acceptance screen.
Click the check box to accept the license.
Click Done in the upper left corner to return to the Initial Setup screen.
If you didn’t configure a network during installation, click Network and host name to configure your network connection.
In the next step you will register your system with Red Hat and attach it to your subscription. Note: For this step to succeed, you must have successfully configured your network connection.
Click Subscription Manager
Leave I will register with set to the default.
if you need to configure an HTTP proxy server, click Configure Proxy
Click Next to move the next screen.
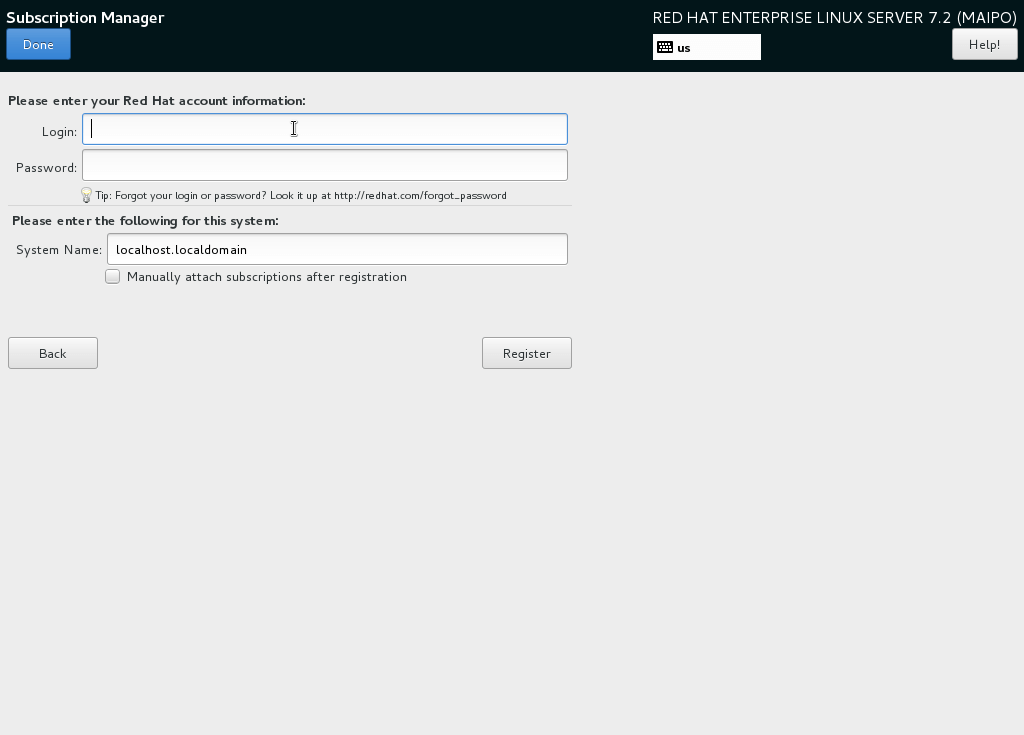
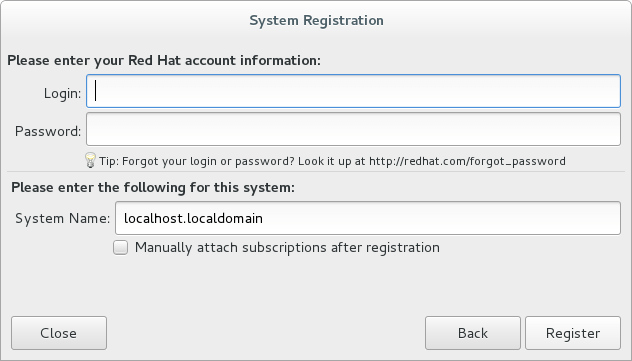
Enter your Red Hat username and password. This is the login that you use for Red Hat sites such as the Red Hat Customer Portal, access.redhat.com.
Optionally, enter a System Name that will be used to identify this system on the Red Hat Customer Portal.
Click Register.
On the next screen you will be shown the list of subscriptions that are available to your user ID. If you have more than one subscription available, select which subscription to attach this system to.
Click Attach.
Click Done.
Finally, Click Finish configuration.
Log in to the system with the username and password you created during installation.
If you didn’t create a regular user, you will need to log in as root and create a user. See Troubleshooting and FAQ.
If you get a text-based login screen instead of a graphical one, see Troubleshooting and FAQ.
Select your preferred language for the GNOME desktop. Then click Next.
Select your keyboard layout. Then click Next.
Optionally follow the dialogs to connect your online accounts or click Skip.
Click Start using Red Hat Enterprise Linux.
You are now logged into Red Hat Enterprise Linux. The Getting Started page of the GNOME Help viewer is opened automatically as a full screen application after your first login. You may minimize, resize, or exit out of that application by using the window controls on the upper right corner.

Proceed to Install the latest updates
Complete installation and register the system (alternate)
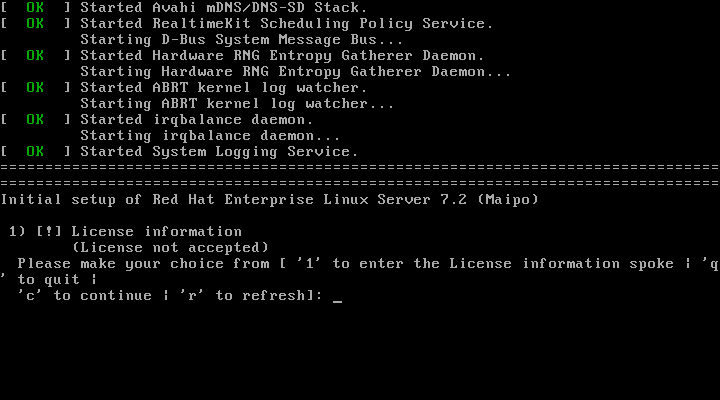
In some cases, when booting the system for the first time, you may not see the graphical post-installation screen. If you see a text-based license acceptance prompt as shown below, follow these alternate instructions:
To accept the license agreement:
Enter 1 and hit return to enter the License information section.
Enter 2 and hit return to accept the license agreement.
Enter c and hit return to leave the License information section.
Enter c and hit return to complete the initial setup.
Log in to the system with the username and password you created during installation at the graphical login screen. If you didn’t create a regular user, you will need to log in as root and create a user. See Troubleshooting and FAQ.
Select your preferred language for the GNOME desktop. Then click Next.
Select your keyboard layout. Then click Next.
Optionally follow the dialogs to connect your online accounts or click Skip.
Click Start using Red Hat Enterprise Linux.
The Getting Started page of the GNOME Help viewer is opened automatically as a full screen application after your first login. You may minimize, resize, or exit out of that application by using the window controls on the upper right corner.
Check that the network connection has been started:
Run Settings from the System Tools group of the Applications menu.
Click the Network icon under the Hardware group of All Settings.
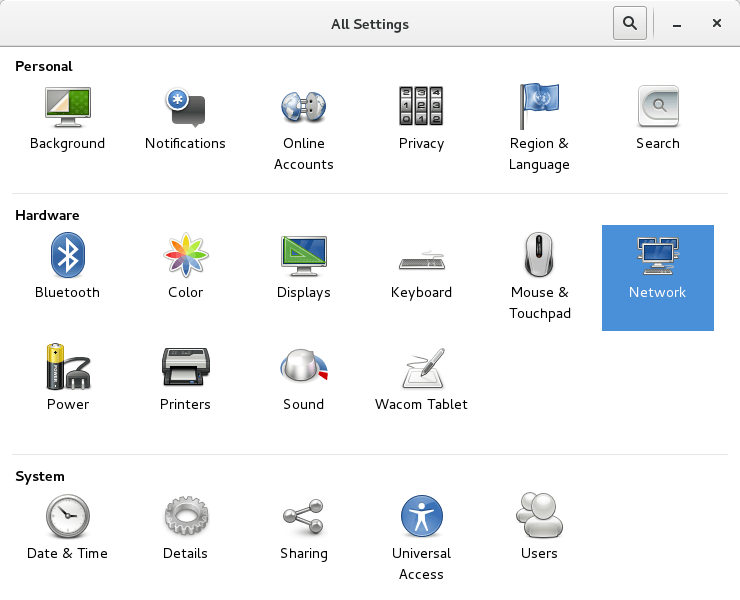
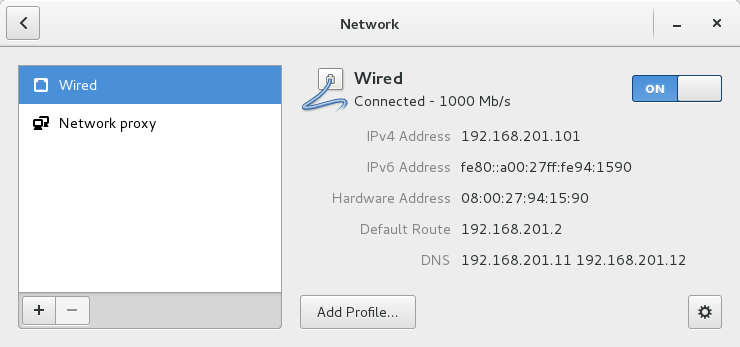
Select the Wired network.
Make sure the toggle switch in the upper right is switched on.
Check that the settings for IP address, default route, and DNS are appropriate for your network. If you need to change them, Click the settings button in the lower right corner.
When you are finished with network settings close the window by clicking the X in the upper right corner.
Now register the system:
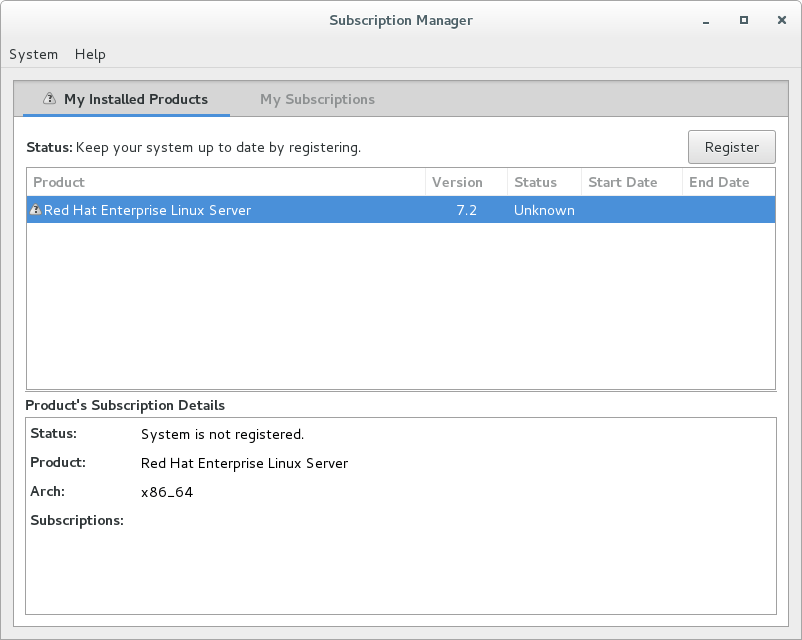
Start Red Hat Subscription Manager from the System tools group of the Applications menu.
Click the Register button in the upper right corner of Subscription Manager.
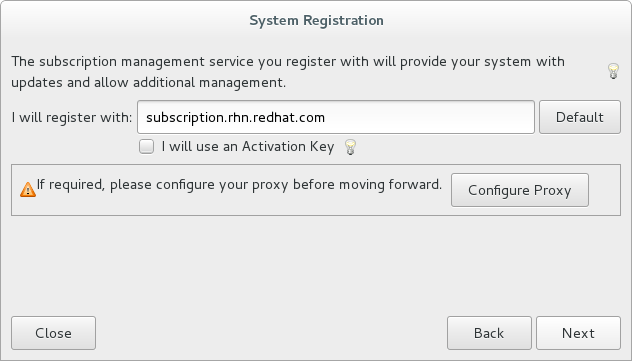
Leave I will register with set to the default on the System Registration dialog.
if you need to configure an HTTP proxy server, click Configure Proxy
Click Next to move the next dialog.
Enter your Red Hat username and password. This is the login that you use for Red Hat sites such as the Red Hat Customer Portal, access.redhat.com.
Optionally, enter a System Name that will be used to identify this system on the Red Hat Customer Portal.
Click Register.
On the next dialog, you will be shown the list of subscriptions that are available to for your Red Hat username. If you have more than one subscription available, select the subscription to attach this system to.
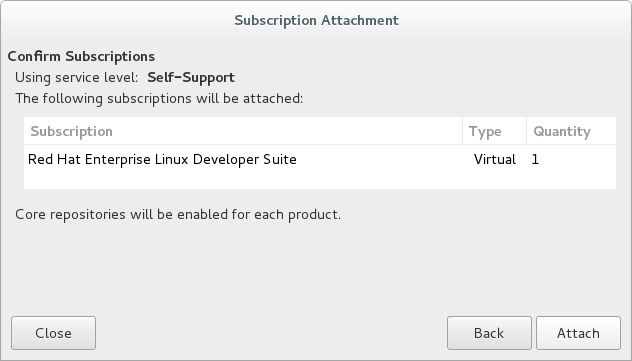
Click Attach.
Click the X in the upper right hand corner to close Red Hat Subscription Manager.
You are now ready to start using Red Hat Enterprise Linux. Next, install the latest updates.
Install the latest updates
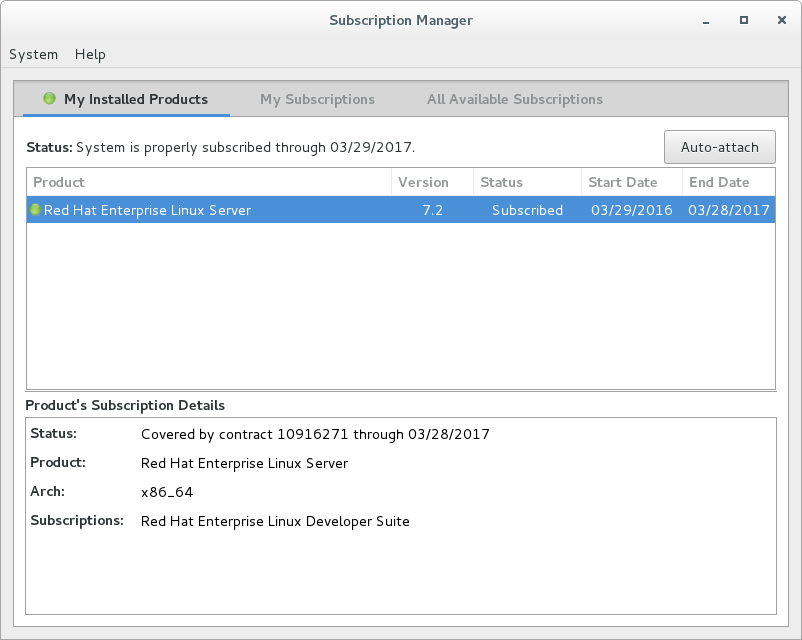
In this step, you will download and install the latest updates for your system from Red Hat. In the process, you will verify that your system has a current Red Hat subscription and is able to receive updates.
First, start a Terminal window from the Application menu. Then, after using to change to the root user ID, use to verify that you have access to Red Hat software repositories.
If you don’t see any enabled repositories, your system might not be registered with Red Hat or might not have a valid subscription. See Troubleshooting and FAQ for more information.
Now download and install any available updates by running .
If yum updates the kernel package or installs a large number of updates, you should reboot your system. You can do this from the VM’s desktop by clicking the down arrow icon in the upper right corner, then clicking the power icon. Alternatively you can reboot the system from the command line:
Enable additional software repositories
In this step you will configure your system to obtain software from the Optional RPMs and RHSCL software repositories. The Optional RPMs repository includes a number of development packages. The RHSCL repository includes the both Red Software Collections as well as Red Hat Developer Toolset (DTS).
4. Build something today
1. Download Red Hat Enterprise Linux (RHEL)
In this step, you will download Red Hat Enterprise Linux Server. For the download, you will need to register with developers.redhat.com. After you register as a developer, you will be given a subscription for Red Hat Enterprise Linux Developer Suite. Red Hat Enterprise Linux Server and additional development tools are included in Red Hat Enterprise Linux Developer Suite.
Download the Red Hat Enterprise Linux Server DVD file.
Note: Later in this guide, you will need the Red Hat username and password you create during registration for accessing Red Hat sites.
2. Install RHEL on Hyper-V
This step provides an overview of the key steps for installing Red Hat Enterprise Linux Server in a Hyper-V Virtual Machine (VM) so you can get started with software development. The VM you create will give you a Red Hat Enterprise Linux development environment that you can use on your system running Microsoft Windows 10, 8.1, or 8.0.
Overview of steps
Enable Hyper-V
Configure a VM to run Red Hat Enterprise Linux.
Boot the VM using the ISO file you downloaded in step 1 as a virtual DVD.
Install Red Hat Enterprise Linux.
Note: This tutorial does not replace the Red Hat Enterprise Linux Installation Guide or Microsoft Hyper-V documentation. Instead, this tutorial provides an overview of the key steps for software developers. For detailed instructions, see the respective manual.
A few things to keep in mind:
You will be using the Server edition of Red Hat Enterprise Linux. This provides you with the widest range of software to develop and test with.
The VM will have a full graphical desktop. You will select Server with a GUI during installation.
After installation, you will configure additional software repositories that will provide you access to optional development software such as RHSCL and DTS.
System Requirements
The requirements for your physical system that will host the Red Hat Enterprise Linux VM are:
a 64-bit x86 machine with hardware virtualization assistance (Intel VT-X or AMD-V) and Second Level Address Translation (SLAT).
Microsoft Windows 10, 8.1 or 8.0.
4 GB RAM (8 GB preferred).
24 GB of available disk space for the VM, the installation ISO file, and Hyper-V.
If you encounter difficulties at any point in this tutorial, see Troubleshooting and FAQ.
Enable Hyper-V
This guide shows the steps for Hyper-V on Windows 10 Professional. The steps Windows 8 and 8.1 are similar but may have small differences. Hyper-V is installed, but not enabled by default on most editions of Windows starting with Windows 8.
To enable Hyper-V the Hyper-V role:
Right click on the Windows button and select Programs and Features
Select Turn Windows Features on or off from the sidebar on the left.
Select Hyper-V from the list in the Turn Windows features on or off dialog.
Click the Hyper-V check box.
Expand the Hyper-V group:
Click Hyper-V Management Tools to enable it.
Ensure that Hyper-V Platform is checked.
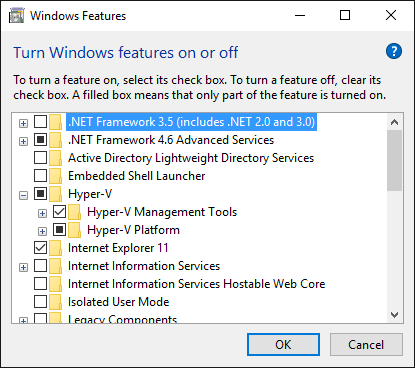
Click OK.
Close the Programs and Features window.
For more information see Install Hyper-V on Windows 10 or consult the documentation for your version of Microsoft Windows. Note: some of the Hyper-V documentation may be listed as "Client Hyper-V" since Hyper-V was originally a server feature.
Enable Intel VT-x or AMD-V Virtualization in BIOS/UEFI
Intel and AMD processors have hardware extensions for accelerating virtualization. On some systems this support may be disabled by default in the system’s BIOS/UEFI. To enable the extensions, you might have to go into the system’s BIOS/UEFI setup configuration at boot time. Consult your system’s hardware documentation for more information.
Create and configure a VM in Hyper-V
In this step, you will create and configure the VM that will run Red Hat Enterprise Linux. The physical system you are running Hyper-V on is called the host system or root partition. The VM is called the guest system or child partition.
First, launch Hyper-V Manager from the Windows menu.
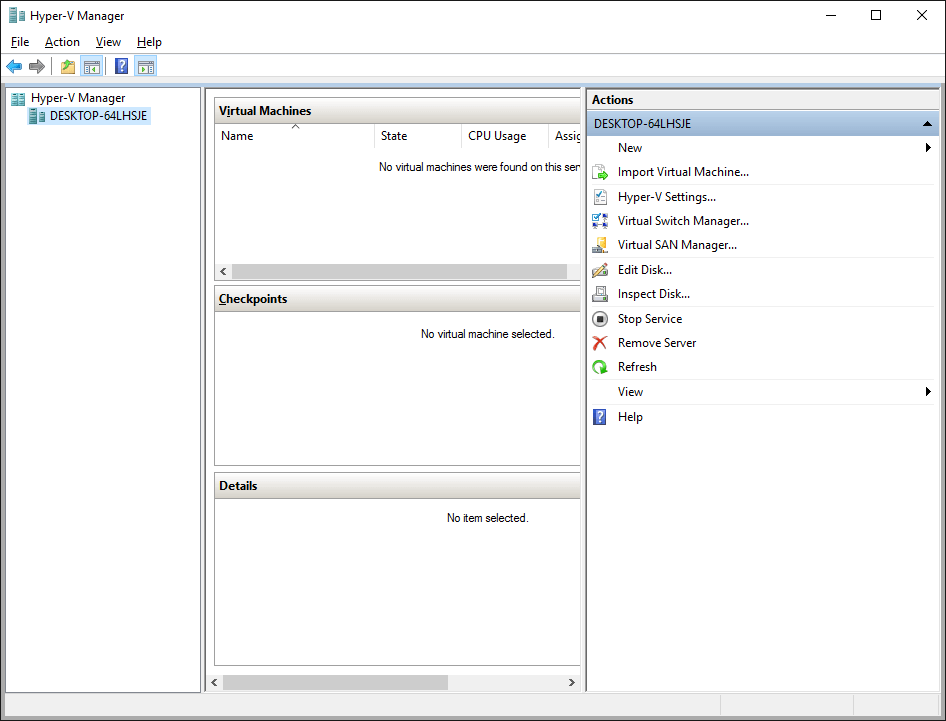
Create a new virtual network switch to provide the VM with network connectivity:
Click Virtual Switch Manager… in the right Actions pane.
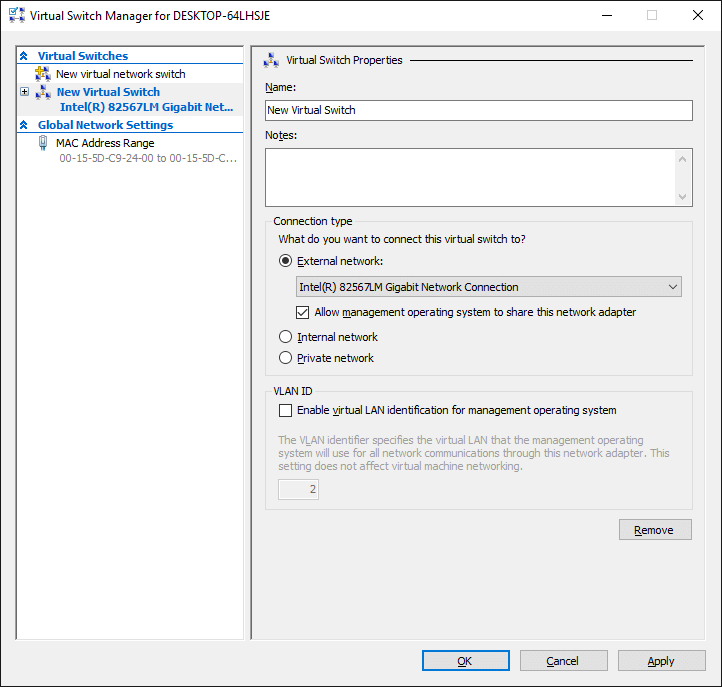
Click External under What type of virtual switch do you want to create?.
Click Create Virtual Switch.
On the Virtual Switch Properties dialog:
Optionally, enter a name for the virtual switch.
Make sure that External network is checked.
If your system has more than one network adapter, such as wired and wireless, choose which network adapter the virtual switch is connected to.
Click OK.
Click Yes in the Apply Networking Changes dialog that warns about disrupting your network connection while making this change.
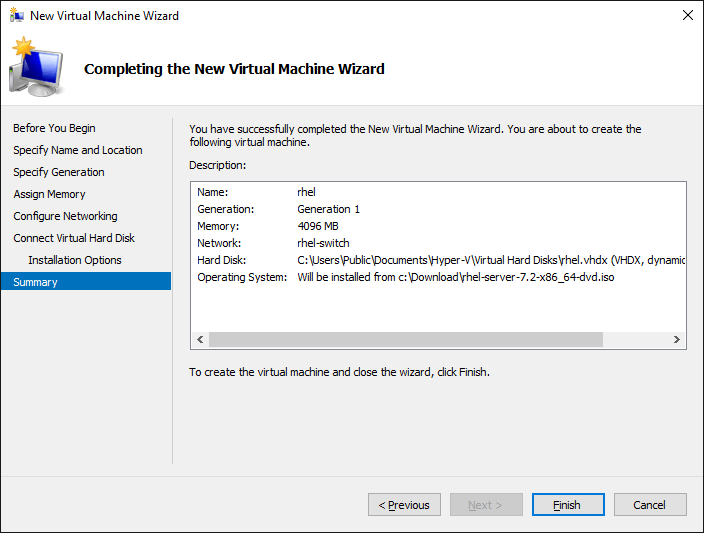
Create a VM by clicking New, then Virtual Machine… in the Actions pane on the right. The New Virtual Machine Wizarddialog will pop-up. Configure the VM as follows:
Click Next to skip past the Before You Begin section.
Under Specify Name and Location:
Enter rhel as the Name of the VM.
Change the location to store the VM’s files if necessary. The default is . Note: you will be prompted later for the location of the VM’s virtual hard disk.
Click Next.
Under Specify Generation:
make sure Generation 1 is checked.
click Next.
Under Assign Memory, set the amount of memory available to the VM. The minimum is 2048 MB, however 4096 MB is suggested.
Click Next.
Under Configure Networking:
Select the virtual switch you created earlier from the Connection list.
Click Next.
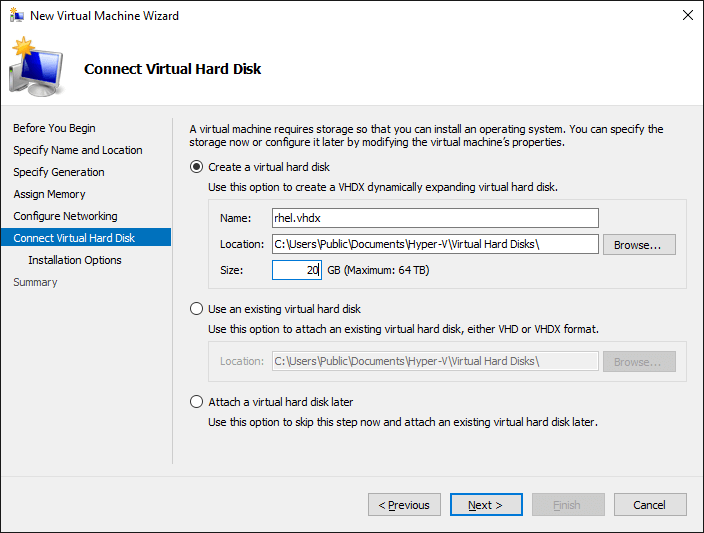
Under Connect Virtual Hard Disk you will configure the new VM’s virtual hard disk (VHD). You will need at least 20 GB of free space to store the VM’s VHD. While this setting can be changed later, it is a multi-step process not covered by this guide. Therefore it is recommended that you size the VHD to be large enough for your software development activities.
Select Create a virtual hard disk if it isn’t already checked.
Enter as the Name of the virtual hard disk.
Change the Location if necessary. By default the VHD will be stored in .
Set the size to 20 GB or larger.
Click Next.
Under Installation Options:
Select Install an operating system from a bootable CD/DVD-ROM.
Select Image fie (.iso).
Click Browse… to navigate to the Red Hat Enterprise Linux Server DVD file you downloaded in step 1.
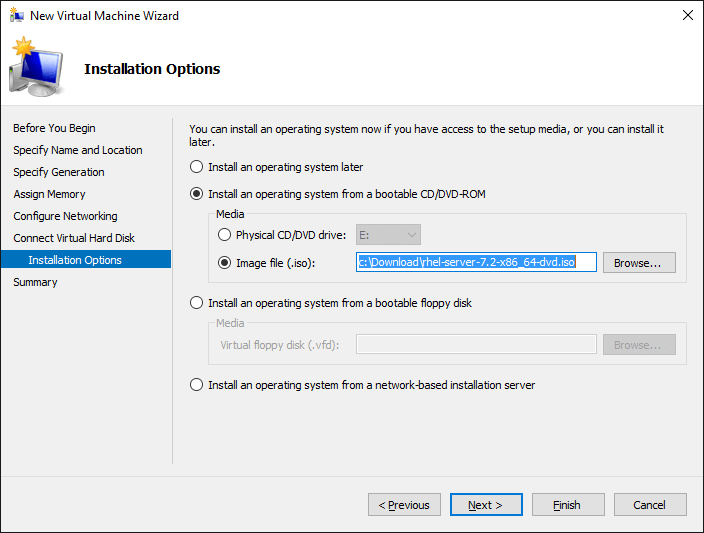
Click Next.
Check your settings on the Summary dialog. Then, click Finish to create the VM.
Boot the VM and install Red Hat Enterprise Linux
To start the VM and begin installation, start Hyper-V Manager if it isn’t already running, then locate the rhel VM in the Action pane on the right and click Start. The VM should now boot up from the Red Hat Enterprise Linux Server DVD.
This section provides a brief overview of the steps for installing Red Hat Enterprise Linux. Detailed instructions can be found in the Red Hat Enterprise Linux Installation Guide.
There are a few key steps to remember during the installation process:
The Installation destination will be the virtual hard disk you created for the VM.
You should configure networking under Network and host name before starting the installation. You will need access to the Internet to complete registration and download additional software. The network can be configured after the system is installed. However, the steps are more straightforward during installation.
Select Server with a GUI under Software Selection so the system will boot into the full graphical environment after installation. By default, Red Hat Enterprise Linux Server will not install a graphical desktop.
Create your primary user account during installation: After the installation begins, you will be instructed to set a password for the root account and be given the opportunity to create a regular user account. You should create a user before the installation process completes. The regular user will be your primary login for development. The root account should only be used for system administration tasks. If you don’t create a user before the installation completes, you will need to reboot and then log in as root to create user accounts.
Installation instructions
Start the system from the bootable disk and select Install Red Hat Enterprise Linux.
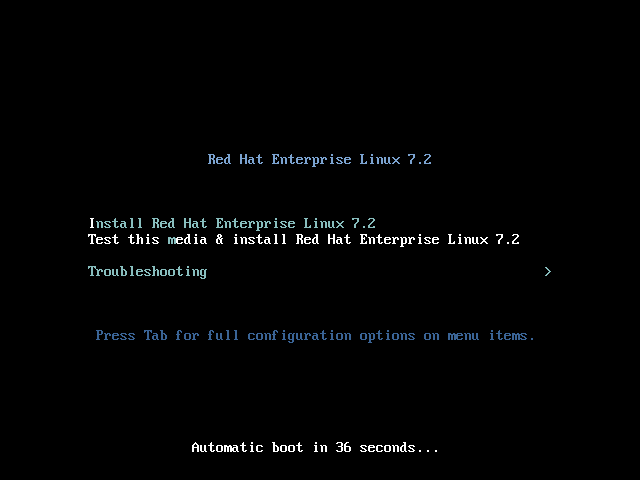
Note: you can skip the media checking step by hitting the Esc key.
Select your preferred language and keyboard layout to use during installation.
Under Localization review the settings and make any necessary changes for date and time, language, and keyboard layout. Note: The Done button to return to the Installation summary screen is located in the upper left corner of the screen.
Perform the follow steps to make your software selection:
Click Software selection.
On the next screen, under Software selection, in the Base environment list on the left, select Server with GUI.
In the list Add-ons for selected environment on the right, select Development tools.
Click the Done button. Note: After returning to the Installation summary screen it will take several seconds to validate your choices.
Click Installation destination to specify the disk/partition to use.
On the Installation Destination screen, under Local Standard Disks, make sure the one disk is checked. This is the virtual hard disk you created earlier.
Click Done.
Click Network & host name to configure the network. If the system has more than one network adapter, select it from the list on the left. Then click the On/Off button on the right to enable the network adapter. Click Configure to review and/or change the default settings for the network adapter. Optionally, set a Host name for the system. Before leaving this screen, make sure there is at least one network adapter enabled with the switch in the Onposition. A network connection will be required to register the system and download system updates.
Click KDump to disable KDump and free up memory. Click the box next to Enable kdump so that it is no longer checked. Then click Done.
Click the Begin installation button when you are ready to start the actual installation.
On the next screen, while the installation is running, click User creation to create the user ID you will use to log in for normal work.
Click Root password to set the password for the root user. Note: If you choose a password that the system considers to be weak, you will need to click Done twice.
After the installation process completes, click the Reboot button.
If you need help, see Troubleshooting and FAQ.
3. Get ready for software development
This section has a number of post-installation steps that complete the installation of Red Hat Enterprise Linux and prepare it for software development. The steps are:
Accept the license agreements and register the system with the Red Hat Subscription Management.
Install the latest software updates.
Add additional software repositories containing development software.
Complete installation and register the system
After installation, during the first boot of the system, you will be asked to accept the license agreement and register the system with Red Hat Subscription Management. Completing these steps are required for your system to download software from Red Hat.
Note: In some cases, when booting the system for the first time, you may not see the graphical post-installation screen shown above. If you see a text-based license acceptance prompt follow the instructions in Complete installation and register the system (alternate) instead.
Click License information to go the license acceptance screen.
Click the check box to accept the license.
Click Done in the upper left corner to return to the Initial Setup screen.
If you didn’t configure a network during installation, click Network and host name to configure your network connection.
In the next step you will register your system with Red Hat and attach it to your subscription. Note: For this step to succeed, you must have successfully configured your network connection.
Click Subscription Manager
Leave I will register with set to the default.
if you need to configure an HTTP proxy server, click Configure Proxy
Click Next to move the next screen.
Enter your Red Hat username and password. This is the login that you use for Red Hat sites such as the Red Hat Customer Portal, access.redhat.com.
Optionally, enter a System Name that will be used to identify this system on the Red Hat Customer Portal.
Click Register.
On the next screen you will be shown the list of subscriptions that are available to your user ID. If you have more than one subscription available, select which subscription to attach this system to.
Click Attach.
Click Done.
Finally, Click Finish configuration.
Log in to the system with the username and password you created during installation.
If you didn’t create a regular user, you will need to log in as root and create a user. See Troubleshooting and FAQ.
If you get a text-based login screen instead of a graphical one, see Troubleshooting and FAQ.
Select your preferred language for the GNOME desktop. Then click Next.
Select your keyboard layout. Then click Next.
Optionally follow the dialogs to connect your online accounts or click Skip.
Click Start using Red Hat Enterprise Linux.
You are now logged into Red Hat Enterprise Linux. The Getting Started page of the GNOME Help viewer is opened automatically as a full screen application after your first login. You may minimize, resize, or exit out of that application by using the window controls on the upper right corner.
Proceed to Disable lock screen and screen power saving.
Complete installation and register the system (alternate)
In some cases, when booting the system for the first time, you may not see the graphical post-installation screen. If you see a text-based license acceptance prompt as shown below, follow these alternate instructions:
To accept the license agreement:
Enter 1 and hit return to enter the License information section.
Enter 2 and hit return to accept the license agreement.
Enter c and hit return to leave the License information section.
Enter c and hit return to complete the initial setup.
Log in to the system with the username and password you created during installation at the graphical login screen. If you didn’t create a regular user, you will need to log in as root and create a user. See Troubleshooting and FAQ.
Select your preferred language for the GNOME desktop. Then click Next.
Select your keyboard layout. Then click Next.
Optionally follow the dialogs to connect your online accounts or click Skip.
Click Start using Red Hat Enterprise Linux.
The Getting Started page of the GNOME Help viewer is opened automatically as a full screen application after your first login. You may minimize, resize, or exit out of that application by using the window controls on the upper right corner.
Check that the network connection has been started:
Run Settings from the System Tools group of the Applications menu.
Click the Network icon under the Hardware group of All Settings.
Select the Wired network.
Make sure the toggle switch in the upper right is switched on.
Check that the settings for IP address, default route, and DNS are appropriate for your network. If you need to change them, Click the settings button in the lower right corner.
When you are finished with network settings close the window by clicking the X in the upper right corner.
Now register the system:
Start Red Hat Subscription Manager from the System tools group of the Applications menu.
Click the Register button in the upper right corner of Subscription Manager.
Leave I will register with set to the default on the System Registration dialog.
if you need to configure an HTTP proxy server, click Configure Proxy
Click Next to move the next dialog.
Enter your Red Hat username and password. This is the login that you use for Red Hat sites such as the Red Hat Customer Portal, access.redhat.com.
Optionally, enter a System Name that will be used to identify this system on the Red Hat Customer Portal.
Click Register.
On the next dialog, you will be shown the list of subscriptions that are available to for your Red Hat username. If you have more than one subscription available, select the subscription to attach this system to.
Click Attach.
Click the X in the upper right hand corner to close Red Hat Subscription Manager.
Disable lock screen and screen power saving
For security and to save energy, the default configuration of Red Hat Enterprise Linux is to lock the screen and turn the screen off when idle. On a VM, it is best to disable these features since the host system will control screen locking and power saving.
To disable these features, from the desktop Application menu, select the System Tools group, then select Settings. Follow these steps in the Settings application.
Click the Privacy icon to bring up the Privacy dialog.
Click on Screen Lock to bring up the Screen Lock dialog.
Click on the On/Off switch to the right of Automatic Screen Lock.
Click the X in the upper right hand corner to dismiss the Screen Lock dialog.
Click the < button in the upper left corner of the Privacy dialog to go back to the main Settings screen.
Click on the Power icon to open the Power settings dialog.
Click the menu button to the right of Blank screen. Select Never from the list of choices.
Finally, Click the ‘X’ in the upper right hand corner to close the Settings application.
Install the latest updates
In this step, you will download and install the latest updates for your system from Red Hat. In the process, you will verify that your system has a current Red Hat subscription and is able to receive updates.
First, start a Terminal window from the Application menu. Then, after using to change to the root user ID, use to verify that you have access to Red Hat software repositories.
If you don’t see any enabled repositories, your system might not be registered with Red Hat or might not have a valid subscription. See Troubleshooting and FAQ for more information.
Now download and install any available updates by running .
Enable additional software repositories
In this step you will configure your system to obtain software from the Optional RPMs and RHSCL software repositories. The Optional RPMs repository includes a number of development packages. The RHSCL repository includes the both the RHSCL software collections as well as DTS (the Red Hat Developer Toolset).
Finally, reboot the VM. You can do this from the VM’s desktop by clicking the down arrow icon in the upper right corner, then clicking the power icon. Alternatively you can reboot the system from the command line:
4. Build something today

0 thoughts to “Where can i download redhat iso reddit”